
10-06-2020
復帰にもおすすめです。
現在復帰3か月くらいでループ720を使ってきましたがより競技向けの機種に挑戦したくてループアップを飛び越してレベルライズを購入しました。結果、値段以上の安定感ですごく満足しています。金属キャップのおかげでループの姿勢が矯正されてるような感覚があります。調整の仕方は少し細かいですが昔のナイスペの作り方の要領を思い出したらギャップ幅の調整もすぐ慣れました。


Payment Method
Shipping Method
Import Tax / Customs:
All customers outside of Japan are subject to be levied import tax or customs fees. Especially, EU, Israel, and Brazil customers!
You are responsible for paying the import tax and duties levied by YOUR country. This amount is decided by your government, so we cannot tell you how much they will charge in advance.
Please be aware of this potential cost. We cannot accept any returns or cancellations due to issues with Tax and Duties. For more details, please check your government customs web site. It is completely out of our control and we cannot do anything about these kinds of fees.
For more information on payment and shipping, click here
If you have any other questions, please contact us using this contact form.
All yo-yos have passed the manufacturer's quality inspection. Quality standards vary by manufacturer. Basically, products that can be used normally are within product specifications.
Examples of possible initial defects
For more information about competitive yo-yos, please see here.
Also, if you have any problems with yo-yos, please check our Q&A.
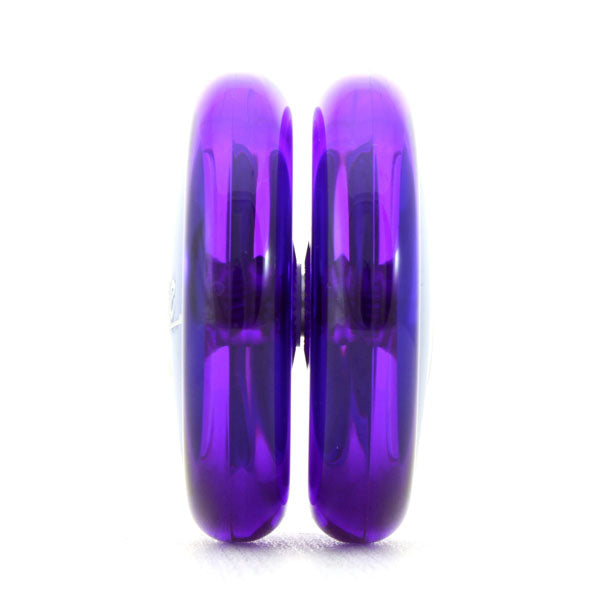
This metal-capped design excels at long stable sleeps and all styles of looping tricks!
**This yo-yo's construction, including the way of assembling, disassembling and adjusting its settings are very different from a normal yo-yo. NOT recommended for beginners!**
An extremely rare find! This new looping yo-yo from JPLS employs METAL side caps! Essentially, it is a Loop Up with a metal side cap, which greatly increases the force of its spin. That unique weight balance gives a boost to both sleeper tricks and looping play as well, improving stability greatly. Especially during looping practice, the Level Rise is very steady and it's easy to stay on course with beautiful orbits and overall improving your looping experience. The added sleep is also impressive, and we expect a lot of new trick development to come on all fronts of looping trick styles.
Assembly and gap adjustment methods are identical to the Loop Up.
*Adjusting the gap width requires a 6mm wrench (sold separately)
*Because the possibility of the yo-yo coming apart during play is increased by the added momentum of the metal caps, we recommend using the Disassembly-proof Nut Set (sold separately)
*During adjustment it's possibly to accidentally cross-thread or overtighten, damaging the axle threading. This greatly reduces the solidity of the assembly and increases the likelihood of accidental disassembly in mid-air. If this happens, we recommend replacing the axle with a new one.
|
Complete Disassembly Instructions
Reassembly Instructions
How to Adjust Gap Width
|
>>How To Disassemble and Reassemble the Loop Up
>>How To Adjust Gap Width on the Loop Up
>>How To Use the Loop Up Disassembly-proof Nut Set
| ブランド | Japan Looping Solutions |
| シリーズ | 特になし |
| シグネチャー | - |
| スタイル | ルーピングトリック (2A) |
| 対象年齢 | 特に表記なし |
| ブランド国 | 日本 |
| 発売年 | 2020 |
| 重さ (g) | 51.1 |
| 直径 (mm) | 58.16 |
| 本体幅 (mm) | 33.1 |
| トラピーズ有効幅 (mm) | 11 |
| ボディ形状 | ノーマル形状 |
| ボディ素材 | プラスチック(ポリカボ/ABSほか) |
| リム種類・素材 | なし |
| ベアリング・軸の種類 | ボールベアリング |
| ベアリングサイズ | |
| レスポンスシステム(サイズ) | スターバースト |
| アクセル(軸) | - |
| 分解 | 可能 |
| スペーサー | カバータイプ |
| バインド | 通常引き戻し |
| 表面加工 | サラサラ加工なし |
| メンテナンス |

| Brand | Japan Looping Solutions |
| Signature | - |
| Style | ルーピングトリック (2A) |
| Designed in | 日本 |
| Release Year | 2020 |
| Weight (g) | 51.1 |
| Diameter (mm) | 58.16 |
| Width (mm) | 33.1 |
| Trapeze Width (mm) | 11 |
| Body Shape | ノーマル形状 |
| Body Material | プラスチック(ポリカボ/ABSほか) |
| Rim | なし |
| Bearing Type | ボールベアリング |
| Bearing Size | |
| Response System | スターバースト |
| Axle | - |
| Takes Apart | 可能 |
| Spacer | カバータイプ |
| Bind | 通常引き戻し |
| Surface | サラサラ加工なし |
| Maintenance |